Node.jsでPromiseを使う場合
先日、東京Node学園12限目に参加しました。そこで@jovi0608さんから紹介があったNode-v0.12に含まれる予定のPromiseを試してみました。試してみて分かったことを書いておきます。
コールバック地獄の例としてよく挙げられる下記のようなコードのようにディレクトリ間でファイル数とファイル名に差分が無いことを確認できればあとはファイルごとのループに書き換えられるような事例ではPromiseの恩恵が受けられます。
fs.readdir(dir1, function(...) {
    fs.readFile(file1, function(...) {
        hash.update(data);
        fs.readdir(dir2, function(...) {
            fs.readFile(file2, function(...) {
                ...
            });
        });
    });
});
ただしMySQLを使用した以下のようなコードはWHERE句に直前のクエリの結果を用いているので、各クエリを非同期で実行できないためコールバック関数で順番に処理せざるを得ません。つまりこれ以上ロジックを変えられないためPromiseを使っても意味がありません。まあ当然です。
connection.query('SELECT * FROM user', function(err, rows, fields) {
    if (err) throw err;

    connection.query('SELECT * FROM user_country WHERE user_id = ' + rows[0].user_id, function(err, rows, fields){
        console.log(rows);
        connection.end();
    });
});
Promiseの恩恵を受けられるのは待ち合わせる目的のみでコールバック関数を使用している場合です。コールバック処理のネストが一掃されるわけではありません。
とはいえ、ディレクトリ操作以外にも外部APIへ複数回問い合わせに行き、それぞれの結果が出そろってから何かをするようなケースだとPromiseの恩恵を受けられるはずです。
例としてtwitterのAPIを使用し、自分のPOSTをリツイートしたユーザIDを調査するロジックを実装しました。
(twitterのAPIはリクエストを投げまくるとHTTP#429(Too Many Requests)を返してよこすのでユーザ数を5としました)
promiseが実装されているNode.jsはgithubのmasterブランチに上がっているものを使用します(2014-05-10現在)。
shimada-k@debian:~/node_pjt/sample/chat$ node -v
v0.11.14-pre
shimada-k@debian:~/node_pjt/sample/chat$ node -e 'console.log(process.versions.v8)'
3.25.30
外部APIはtwitterのAPIを使用し、twitterのNodeモジュールはnode-twitterを使用しました。
コールバックを使用した場合
// tweet_idのツイートをリツイートしたuser_idを返す
function getRetweeter(tweet_id) {
    twit.get('/statuses/retweeters/ids.json', {'id' : tweet_id}, function(retweeters) {
        if(retweeters){
            console.log(retweeters.ids);
            return retweeters.ids;
        }
        else{
            var err = Error("[/statuses/retweeters] APIアクセスエラー");
            throw err;
        }
    });
}

// 自分のtweetでリツイートされたものを返す
function getRetweeted() {
    var retweeter_ids = new Array();

    twit.get('/statuses/retweets_of_me.json', {'count' : '5'}, function(tweet) {
        if(tweet){
            for(var i = 0; i < tweet.length; i ++){
                console.log(tweet[i].text + '@' + tweet[i].id_str);

                try {
                    var retweeters = getRetweeter(tweet[i].id_str);
                    retweeter_ids.push(getRetweeter(tweet[i].id_str));
                } catch(e) {
                    console.log(e);
                }
            }
            //console.log(tweet);
        }
        else{
            var err = new Error("[/statuses/retweets_of_me] APIアクセスエラー");
            throw err;
        }
    });

    return retweeter_ids;
}

function getRetweeters() {
    try{
        var retweeted = getRetweeted();
        console.log(retweeted);
    } catch(e) {
        console.log(e);
    }
}

getRetweeters();
Promiseを使用した場合
// tweet_idのツイートをリツイートしたuser_idを返す
function getRetweeter(tweet_id) {
    return new Promise(function(onFulfilled, onRejected) {
        //console.log(tweet_id);
        twit.get('/statuses/retweeters/ids.json', {'id' : tweet_id}, function(retweeters) {
            if(retweeters){
                console.log(retweeters.ids);
                onFulfilled(retweeters.ids);
            }
            else{
                var err = new Error("[/statuses/retweeters] APIアクセスエラー");
                onRejected(err);
            }
        });
    });
}

// 自分のtweetでリツイートされたものを返す
function getRetweeted() {
    var ids = new Array();
    return new Promise(function(onFulfilled, onRejected) {
        twit.get('/statuses/retweets_of_me.json', {'count' : '5'}, function(tweet) {
            if(tweet){
                for(var i = 0; i < tweet.length; i ++){
                    console.log(tweet[i].text + '@' + tweet[i].id_str);
                    ids.push(tweet[i].id_str);
                }
                //console.log(tweet);
                onFulfilled(ids);
            }
            else{
                var err = new Error("[/statuses/retweets_of_me] APIアクセスエラー");
                onRejected(err);
            }
        });
    });
}

function getRetweeters() {
    return getRetweeted().then(function(ids) {
        return Promise.all(ids.map(function(id) {
            return getRetweeter(id);
        }));
    }).then(
        function(x) {
            console.log(x);
        },
        function(err) { // all case of errors
            console.log(err.messages);
        }
    );
}

getRetweeters();
エラーの捕捉箇所が一元化されて大分見通しが良くなりました。
imlib2のdraw_textで遊んでみる
Rubyの画像処理ライブラリimlib2で画像に文字を埋め込んで遊んでみました。
環境
- OS:Debian Squeeze
- Ruby:ruby 1.8.7
- libimlib2-ruby:0.5.2-2
入力した文字列の文字数によって適切にフォントのサイズと縦横のマージンを計算し、さらに一行におさまる長さで改行を挟んで画像内に表示するコードを書いてみました。
フォントの大きさの単位はpt(ポイント)指定ですので、フォントサイズを決める時は画像の大きさとの兼ね合いでpx(ピクセル)からptへ変換する必要があります。
また、LinuxはDPIが96なのでpxで計算した値をフォントサイズとすると画像からはみ出してしまいます。
(imlibのコンパイルオプションで決まっているかX11の設定をAPI経由で引っ張ってきているかだと予想しています)
全角・半角が混在してる文字列を解析するのはアルゴリズムが複雑になるので、ASCII文字は全角化します。そのためgemでmojiをインストールしておきます。インストールの仕方はこちらを参照
今回は単色青色の240x240の画像に白い文字を書いてみました。

使用フォント:/usr/share/fonts/truetype/ttf-japanese-gothic.ttf
全角化してるためASCII文字はなんか間延びしてる印象。

文字数が多てもサイズとマージンが最適化されます。

フォントサイズはpt指定ですが、draw_textの引数で渡す座標はpx指定なので注意が必要です。
img.draw_text(font,
    str_entry,
    stringAndSize['offset_horizon'],
    stringAndSize['offset_vertical'] + pt2px((stringAndSize['margin_vertical'] + stringAndSize['size']) * index),
    color)
フォントのパスを追加すればwebからダウンロードしたフォントも使用できます。パスはttfファイルが直下に存在するディレクトリを指定すればOK
# フォントのパス追加
Imlib2::Font.add_path('/home/shimada-k/Development/fonts')
Imlib2::Font.add_path('/home/shimada-k/Development/fonts/mplus-TESTFLIGHT-058')
今回は以下のフォントを使ってみました。
自由の翼フォント(JiyunoTsubasa)

うつくし明朝体(UtsukushiMincho)

うずらフォント(uzura)

フロップデザインフォント(FLOPDesignFont)

M+ FONTS(mplus-TESTFLIGHT)

ロゴたいぷゴシック(07LogoTypeGothic7)

ロゴたいぷゴシックが一番おさまりがいい。
MySQLでインデックスが効いてないとつまりどうなるのか
MySQLでインデックスを使用しないクエリを投げると実際遅いことは分かるんですけど、マジックワード感があるのでなぜ遅くなるのか考えてみました。
すごく大きなテーブルを作ってインデックスを使用したSELECTとそうでないSELECTを投げてperfで調査しました。
環境
perfをインストールします
apt-get install google-perftools linux-tools-2.6.32
これでperfが動く環境になりました。次に実験用のテーブルを作りガツっとデータをINSERTします。今回使用するテーブルは下記のような構造にしました。1ユーザごとに100件のレコードを保持していることを想定して、100万ユーザ分のデータをINSERTすることにします。
mysql> DESC owning_muffins;
+------------+---------------------+------+-----+---------+----------------+
| Field      | Type                | Null | Key | Default | Extra          |
+------------+---------------------+------+-----+---------+----------------+
| id         | bigint(20) unsigned | NO   | PRI | NULL    | auto_increment |
| user_id    | bigint(20) unsigned | NO   |     | NULL    |                |
| flavor_id  | int(11)             | NO   |     | NULL    |                |
| blueberry  | tinyint(4)          | YES  |     | NULL    |                |
| strawberry | tinyint(4)          | YES  |     | NULL    |                |
| chocochip  | tinyint(4)          | YES  |     | NULL    |                |
| nuts       | tinyint(4)          | YES  |     | NULL    |                |
| created_at | datetime            | YES  |     | NULL    |                |
+------------+---------------------+------+-----+---------+----------------+
8 rows in set (0.00 sec)
INSERTするバッチ
require 'rubygems'
require 'mysql'

# insertData.rb
# データを大量にinsertするコード
# テーブルはユーザごとに100のデータを持っていることを想定
# ユーザは100万人とする
# insertするデータ数は100万×100で100000000

def insertData
    con = Mysql::connect('host', 'user', 'password', 'db_name')
    sql = 'SET NAMES utf8'
    con.query sql

    for user_id in 1..1000000 do
        for has_muffin in 1..100 do
            query_string = 'INSERT INTO owning_muffins (user_id, flavor_id, blueberry, strawberry, chocochip, nuts, created_at) values(' << user_id.to_s  << ',' << rand(10).to_s << ',' << rand(2).to_s << ',' << rand(2).to_s << ',' << rand(2).to_s << ',' << rand(2).to_s << ',\'' << Time.now.strftime("%Y-%m-%d %H:%M:%S") << '\');'
            # puts query_string
            con.query query_string
        end
    end
end

insertData()
バッチ終了後には100×100万で1億レコードのテーブルになります。
#ちなみにこのINSERTバッチ、実行完了まで丸2日かかりましたw
これでデータが入ったのでSELECTするバッチを実行してperfで計測します。
require 'rubygems'
require 'mysql'

# fetchData.rb
# データをselectするコード
# インデックスを効かせたselectか効かないselectか選択する
# 引数付きで実行するとインデックスを使用しない検索を行う

def fetchData(has_index = true)
    con = Mysql::connect('host', 'user', 'password', 'db_name')
    sql = 'SET NAMES utf8'
    con.query sql

    id = rand(100000000)
    user_id = rand(1000000)

    if has_index then
        ids = ''
        for id in 1..100 do
            if id == 100 then
                ids <<  (user_id * 100 + id).to_s
            else
                ids <<  (user_id * 100 + id).to_s << ','
            end
        end
        # puts ids
        query_string = 'SELECT * FROM owning_muffins WHERE id in (' << ids << ')'
    else
        query_string = 'SELECT * FROM owning_muffins WHERE user_id = ' << user_id.to_s
    end

    #puts query_string
    data = con.query query_string

    ret_array = Array.new

    while(record = data.fetch_hash())
        ret_array.push(record)
    end

    # 標準出力に表示する
    # for i in 0..ret_array.length - 1 do
    #  puts ret_array[i]['id']
    # end
end

# 引数があればインデックスを無効にする
if ARGV[0] then
    has_index = false
else
    has_index = true
end

fetchData(has_index)
インデックスを使用したクエリをたたくものとインデックスをしないクエリをたたく2種類の計測を行いました。
MySQLがどんな風に子プロセスor子スレッドを作ってるか分からないのでシステム全体でイベントを計測します(-aオプションを使用する場合はrootにならないとダメです)。さらに誤差を考えてそれぞれ10回ずつ実行した平均をとります。計測コマンドは下記の通り。
# インデックスを使用した場合
perf stat -a -r 10 -e cpu-clock,task-clock,page-faults,cpu-migrations,L1-dcache-load-misses,L1-dcache-store-misses,L1-dcache-prefetch-misses,L1-icache-load-misses,L1-icache-prefetch-misses,LLC-load-misses,LLC-store-misses,LLC-prefetch-misses ruby fetchData.rb

# インデックスを使用しない場合
perf stat -a -r 10 -e cpu-clock,task-clock,page-faults,cpu-migrations,L1-dcache-load-misses,L1-dcache-store-misses,L1-dcache-prefetch-misses,L1-icache-load-misses,L1-icache-prefetch-misses,LLC-load-misses,LLC-store-misses,LLC-prefetch-misses ruby fetchData.rb hoge
計測結果です。まずはインデックスが効いている場合
| score | event |
|---|---|
| 229.827713 | cpu-clock-msecs |
| 229.937963 | task-clock-msecs |
| 2676 | page-faults |
| 3 | CPU-migrations |
| 34293 | L1-dcache-load-misses |
| 1799415 | L1-dcache-store-misses |
| 559063 | L1-dcache-prefetch-misses |
| 1103446 | L1-icache-load-misses |
| not counted | L1-icache-prefetch-misses |
| 1074416 | LLC-load-misses |
| 123611 | LLC-store-misses |
| 444980 | LLC-prefetch-misses |
実行にかかった時間は0.057323544秒でした(10回の平均値)
次はインデックスが効いていない場合
| score | event |
|---|---|
| 115113.325665 | cpu-clock-msecs |
| 115114.371156 | task-clock-msecs |
| 4654 | page-faults |
| 40 | CPU-migrations |
| 11365832 | L1-dcache-load-misses |
| 1050214193 | L1-dcache-store-misses |
| 211685824 | L1-dcache-prefetch-misses |
| 53432908 | L1-icache-load-misses |
| not counted | L1-icache-prefetch-misses |
| 164818024 | LLC-load-misses |
| 171005281 | LLC-store-misses |
| 119857977 | LLC-prefetch-misses |
実行にかかった時間は28.792978184秒でした(10回の平均値)
実行時間はおおよそ502倍になっています。最初io-waitが頻発してるのかと思っていましたがそうではなさそうです。cpu-clockと総実行時間から逆算したio-waitの時間が0に近いので他の要因であると考えます。
実行時間が502倍なのでインデックスが効いている場合の各値を502倍してインデックスが効いていない場合の数値と比較してみました。
#各数値が実行時間と正比例する前提の方法論なので乱暴ですが俯瞰して比較する際の指針にはなりえるかも、と考えました。
| index_not_use / (502 * index_use) | event |
|---|---|
| 0.9971710235 | cpu-clock-msecs |
| 0.996701955 | task-clock-msecs |
| 0.003462475541 | page-faults |
| 0.02654514983 | CPU-migrations |
| 0.6598454059 | L1-dcache-load-misses |
| 1.161964851 | L1-dcache-store-misses |
| 0.7538370338 | L1-dcache-prefetch-misses |
| 0.09640602364 | L1-icache-load-misses |
| not counted | L1-icache-prefetch-misses |
| 0.3054067844 | LLC-load-misses |
| 2.754221392 | LLC-store-misses |
| 0.5362569033 | LLC-prefetch-misses |
L1とLLC(ラスト・レベル・キャッシュ。今回使用したマシンは3次までCPUキャッシュがあるのでL3キャッシュのこと)のSTOREキャッシュミスが比較的多いことが分かります。なのでデータをキャッシングしておく際のオーバーヘッドが大きいようです。
- キャッシュを参照
- キャッシュに無い
- メモリか他のキャッシュからデータを取ってきて自分の所に保存
これを都度繰り返しているということになります。フルスキャンなのでそのようになるのでしょう。
#なぜL1キャッシュよりL3キャッシュのミスの方が割合が多いのかというのはプロセスマイグレーションの話とかCPUキャッシュのウェイ数とかが関係してきそうなのでこれ以上深追いはしたくない。
twitterの投稿画面風UIの作り方
iPhone版twitterアプリのようなアップロードUIを作ってみました。

こういうやつです。上記はtwitterのtweet入力画面です。
テキストを入力する場所があって、その下にキーボードがある。さらにその間にツールバーのような領域があってボタンを配置できる。というもの。twitterの場合は位置情報とカメラとフォトライブラリの3つのボタンがあります。
調べていくとUITextViewのAccessoryViewを使えば実現できることが分かりました。
作ってみたものはSingleViewApplicationをベースにNavigationControllerを入れて初期画面のWriteボタンをタップしたら入力用の画面へ遷移する。遷移先にはUITextViewと、UIViewにラップされたツールバーがあってツールバーにカメラボタンが含まれているというものです。
#カメラボタンを押した時の挙動は実装してないのでログしかでません。。
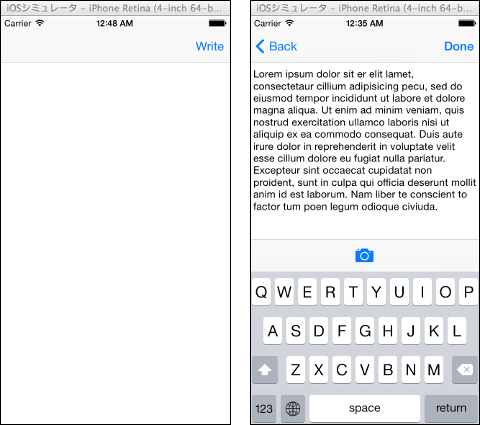
#UITextViewに表示されている英文はデフォの文章です
AccessoryView用のUIViewはInterfaceBuilderのDockエリアに置くことです。実験した環境ではDockエリアでは無いところに置くとキーボードの下に隠れてしまいました。
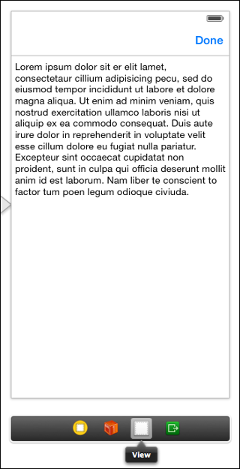
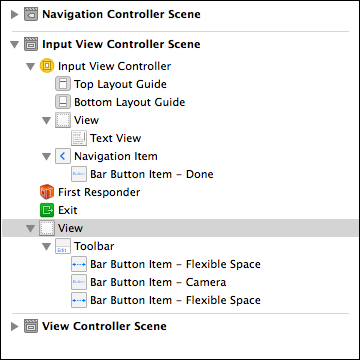
InterfaceBuilder上の親子関係はこんな感じ。
ちなみにchatworkのモバイルアプリでも同じようなUIが使われてます。わりと一般的なUIのはずなのに日本語で解説してるサイトが少なすぎる。
Dockエリアに置いている状態だとInterfaceBuilder上で見た目が確認できないのでAccessoryViewを弄るときは一度どこかのサブビューに置いてからの方がよいと思います。
ソース全文
//
//  MUInputViewController.m
//  modernUpload
//
//  Created by 島田克弥 on 2014/03/15.
//  Copyright (c) 2014年 shimada-k. All rights reserved.
//

#import "MUInputViewController.h"

@interface MUInputViewController ()
@property (weak, nonatomic) IBOutlet UITextView *sendTextView;
@property (strong, nonatomic) IBOutlet UIView *accessoryView;

- (IBAction)startCamera:(UIBarButtonItem *)sender;
- (IBAction)writeDone:(UIBarButtonItem *)sender;

@end

@implementation MUInputViewController

- (id)initWithNibName:(NSString *)nibNameOrNil bundle:(NSBundle *)nibBundleOrNil
{
    self = [super initWithNibName:nibNameOrNil bundle:nibBundleOrNil];
    if (self) {
        // Custom initialization
    }
    return self;
}

- (void)viewWillAppear:(BOOL)animated {
    [super viewWillAppear:animated];

    // 入力状態にする
    [self editAction:self];
}


- (void)viewDidLoad
{
    [super viewDidLoad];
    // Do any additional setup after loading the view.

    _sendTextView.delegate = self;
    // キーボードが出てくる時の通知を受け取るよう設定
    [[NSNotificationCenter defaultCenter] addObserver:self
                                             selector:@selector(keyboardWillShow:)
                                                 name:UIKeyboardWillShowNotification
                                               object:nil];
    // キーボードが閉じらる時の通知を受け取るよう設定
    [[NSNotificationCenter defaultCenter] addObserver:self
                                             selector:@selector(keyboardWillHide:)
                                                 name:UIKeyboardWillHideNotification
                                               object:nil];

}

- (IBAction)writeDone:(UIBarButtonItem *)sender {
    [_sendTextView resignFirstResponder];
}

- (void)editAction:(id)sender {
    [_sendTextView becomeFirstResponder];
}

- (void)didReceiveMemoryWarning
{
    [super didReceiveMemoryWarning];
    // Dispose of any resources that can be recreated.
}

#pragma mark - Text view delegate methods
- (BOOL)textViewShouldBeginEditing:(UITextView *)textView{

    if (_sendTextView.inputAccessoryView == nil) {
        _sendTextView.inputAccessoryView = _accessoryView;
    }

    return YES;
}

- (BOOL)textViewShouldEndEditing:(UITextView *)textView {

    [textView resignFirstResponder];

    return YES;
}

#pragma mark - Responding to keyboard events
- (void)keyboardWillShow:(NSNotification *)notification {

    NSDictionary *userInfo = [notification userInfo];

    // キーボードが表示完了後の場所と大きさを取得する
    NSValue *aValue = [userInfo objectForKey:UIKeyboardFrameEndUserInfoKey];

    CGRect keyboardRect = [aValue CGRectValue];
    keyboardRect = [self.view convertRect:keyboardRect fromView:nil];

    CGFloat keyboardTop = keyboardRect.origin.y;
    CGRect newTextViewFrame = self.view.bounds;

    // キーボードの大きさに応じてテキスト表示領域を再計算する
    newTextViewFrame.size.height = keyboardTop - self.view.bounds.origin.y;

    // キーボードのアニメーション時間を取得する
    NSValue *animationDurationValue = [userInfo objectForKey:UIKeyboardAnimationDurationUserInfoKey];
    NSTimeInterval animationDuration;
    [animationDurationValue getValue:&animationDuration];

    // アニメーション実行準備
    [UIView beginAnimations:nil context:NULL];
    [UIView setAnimationDuration:animationDuration];

    // UITextViewの大きさを変更する
    _sendTextView.frame = newTextViewFrame;

    // アニメーションの開始
    [UIView commitAnimations];
}

- (void)keyboardWillHide:(NSNotification *)notification {

    NSDictionary *userInfo = [notification userInfo];

    // キーボードのアニメーション時間を取得する
    NSValue *animationDurationValue = [userInfo objectForKey:UIKeyboardAnimationDurationUserInfoKey];
    NSTimeInterval animationDuration;
    [animationDurationValue getValue:&animationDuration];

    [UIView beginAnimations:nil context:NULL];
    [UIView setAnimationDuration:animationDuration];

    // UITextViewの大きさを元に戻す
    _sendTextView.frame = self.view.bounds;

    // アニメーションの開始
    [UIView commitAnimations];
}


/*
#pragma mark - Navigation

// In a storyboard-based application, you will often want to do a little preparation before navigation
- (void)prepareForSegue:(UIStoryboardSegue *)segue sender:(id)sender
{
    // Get the new view controller using [segue destinationViewController].
    // Pass the selected object to the new view controller.
}
*/

- (IBAction)startCamera:(UIBarButtonItem *)sender {
    NSLog(@"写真がとれたらいいね");
}

@end
参考サイト
Node.jsでサーバ間通信
Node.jsのAPI内で別サーバへ問い合わせてその内容をejsへ渡すということをやってみました。リアルタイム性を持たせたいからNode.js/websocketなんだけども、処理全部をjsで書くのはなーという考えからきてます。
    var options = {
        host : 'localhost',
        // ポート番号
        port : 8001,
        // APIのパス
        path : '/hoge?foo=' + bar,
    };

    http.get(options, function(resp) {
        var content = "";

        resp.on('data', function(chunk){
            content += chunk;
        }).on('end', function(){
            data = JSON.parse(content);
            console.log(data);

            res.render('index.ejs', {
                layout: false,
                locals: {server_data : data}
            });
        });
    }).on('error', function(e) {
        console.log("Got error: " + e.message);
    });
Nodeサーバは80番で動かして8001番でApacheを動かしてsinatraでバックエンドを構築しているという環境です。物理的には同じ筐体内で完結しています。
バックエンドはsinatraのRubyで書くなら以下のような形式になります。
get '/hoge' do
    #
    # 何かの処理
    #
    JSON.generate(data)
end
JSON.generateしているのはNode側へ渡すときにjson形式にしているからです。json形式に縛られる必要は特にないです。
http-proxyモジュールなどを経由してNodeサーバを動かす場合はルーターの設定を工夫すれば外部からバックエンドのAPIへNode経由ではなく直接アクセスさせることも可能です。
var httpProxy = require('/usr/local/lib/node_modules/http-proxy');

var options = {
  //hostnameOnly: true,

  router: {
    'サーバ名/hoge'    :'localhost:8001/hoge',
  }
};

var prodServer = httpProxy.createServer(options);
prodServer.listen(80);
console.log('prodServer works');
リアルタイム部分はNode.jsで書いてバックエンドは使い慣れた処理系で、といったシチュレーションは結構あるような気がします。
Interface Builderで置いたBarButtonItemにアイコン画像を設定する
UIBarButtonItemのアイコンを独自のものに差し替えたい場合の手段です。若干はまったのでメモ書き。下の画像のように2つのBarButtonItemが配置されているとします。

facebookのいいね!の画像をアイコンとして設定することとします。
like40x36.png

コードから指定する場合
    UIImage *image = [UIImage imageNamed:@"like40x36.png"];
    [_item1 setImage:image];
僕はsetImageではなくsetBackgroundImageを使用してたためBarButtonItem.titleが表示されてしまい途方にくれていました。setBackgroundImageではなくsetImageを使用します。
Interface Builderから指定する場合
対象のUIBarButtonItemオブジェクトを選択した状態でimageを指定します。画像ファイルがプロジェクトに正しく追加されていれば右側の矢印ボタンから選択できます。ここではitem2の方の画像をいいね画像に差し替えます。

ここまでの状態でInterface Builder上では下のような見え方になります。
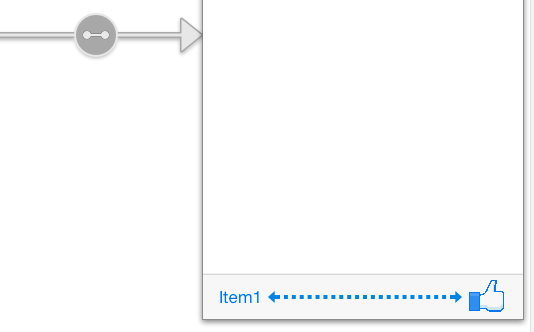
実行すると両方いいね!の画像にアイコン画像が変更されているはずです。

コードからアイコン画像を指定する場合はBarButtonItemをアウトレット接続しないといけないのでInterface Builderから指定する方法の方がスマートだと思います。
ソース全文
//
//  BBIViewController.m
//  barButtonIcon
//
//  Created by 島田克弥 on 2014/03/08.
//  Copyright (c) 2014年 shimada-k. All rights reserved.
//

#import "BBIViewController.h"

@interface BBIViewController ()
@property (weak, nonatomic) IBOutlet UIBarButtonItem *item1;
- (IBAction)tabItem1:(UIBarButtonItem *)sender;
- (IBAction)tabItem2:(UIBarButtonItem *)sender;

@end

@implementation BBIViewController

- (void)viewDidLoad
{
    [super viewDidLoad];
	// Do any additional setup after loading the view, typically from a nib.
    UIImage *image = [UIImage imageNamed:@"like40x36.png"];
    [_item1 setImage:image];
}

- (void)didReceiveMemoryWarning
{
    [super didReceiveMemoryWarning];
    // Dispose of any resources that can be recreated.
}

- (IBAction)tabItem1:(UIBarButtonItem *)sender {
    NSLog(@"item1が押されたよ");
}

- (IBAction)tabItem2:(UIBarButtonItem *)sender {
    NSLog(@"item2が押されたよ");
}
@end
CollectionViewとWebViewで画像ビューワを作ってみる
せっかくiOSの開発環境が手元にあるので試しにアプリを作ってみました。
webの画像をCollectionViewで表示する画像ビューワです。
Googleのロゴ画像を出しています。

WebViewでロゴ画像のURLを指定してCollectionViewで並べてるだけです。
まずCollectionViewを追加します。ControllerではなくViewのほう。
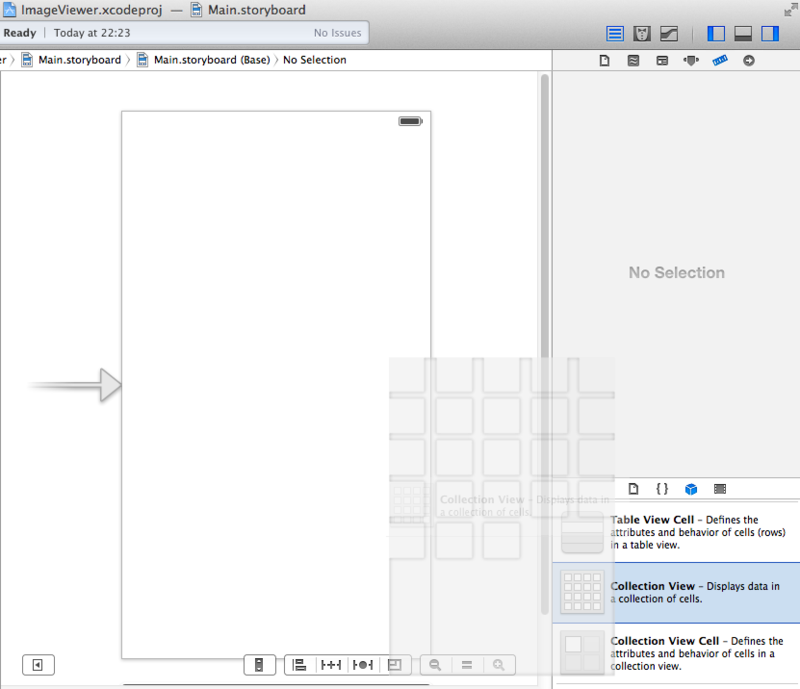
次にCellの中にWebViewを追加します。

親子関係はこんな感じ。
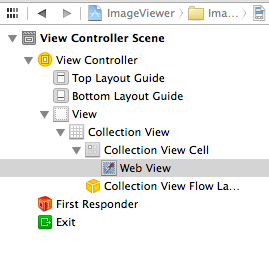
CollectionViewのセルにIDを振っておきます。ソースからアクセスするためです。
WebViewにタグを付けておきます。これもソースからアクセスするためです。

最後にCollectionViewをソースとアウトレット接続します。mファイルに接続しておきます。
これでIBの操作は終わり。あとはソースを書いていきます。
データソースの指定をやります。viewDidLoadの中。
[_ViewerContents setDataSource:(id)self];
numberOfSectionsInCollectionViewとnumberOfItemsInSectionメソッドを追加します。セクションは1つだけで今回はセルの数を36とか適当に指定しておきます。
- (NSInteger)numberOfSectionsInCollectionView:(UICollectionView *)collectionView
{
    //セクションは1つ
    return 1;
}

// セルの個数を返すメソッド
-(NSInteger)collectionView:(UICollectionView *)collectionView numberOfItemsInSection:(NSInteger)section{
    return 36;
}
cellForItemAtIndexPathを追加します。こいつはセルごとに呼び出されるメソッドです。今回はGoogleのロゴ画像を36個分、同じものを表示するので、indexPath.rowでごにょごにょする必要なし。
ここまでで先ほどのアプリが完成。ただし「Google」のGの上の方しか表示されてないのでIBでWebViewを選択して「Scales Page To Fit」にチェックを入れておきます。これで画像ファイルの大きさがWebViewのサイズにあわせて自動的にスケールしてくれます。

これで縦のサイズはWebViewにスケールしてくれました。まあ、Googleは横長なんでしょうがないってことで。

ソース全文
IVViewController.m
//
//  IVViewController.m
//  ImageViewer
//
//  Created by 島田克弥 on 2014/02/15.
//  Copyright (c) 2014年 shimada-k. All rights reserved.
//

#import "IVViewController.h"

@interface IVViewController ()
@property (weak, nonatomic) IBOutlet UICollectionView *ViewerContents;

@end

@implementation IVViewController

- (NSInteger)numberOfSectionsInCollectionView:(UICollectionView *)collectionView
{
    //セクションは1つ
    return 1;
}

// セルの個数を返すメソッド
-(NSInteger)collectionView:(UICollectionView *)collectionView numberOfItemsInSection:(NSInteger)section{
    return 36;
}

//Method to create cell at index path
-(UICollectionViewCell *)collectionView:(UICollectionView *)collectionView cellForItemAtIndexPath:(NSIndexPath *)indexPath{

    NSLog(@"セル番号だよ index_path.row:%ld", indexPath.row);
    UICollectionViewCell *cell;

    cell = [collectionView dequeueReusableCellWithReuseIdentifier:@"cell1"forIndexPath:indexPath];
    cell.backgroundColor = [UIColor blackColor];

    UIWebView *image = (UIWebView *)[cell viewWithTag:1];

    NSString *str_url = @"https://www.google.co.jp/images/srpr/logo11w.png";
    NSURL * url = [NSURL URLWithString:str_url];
    NSURLRequest *urlReq = [NSURLRequest requestWithURL:url];
    [image loadRequest:urlReq];

    return cell;
}

- (void)viewDidLoad
{
    [super viewDidLoad];
	// Do any additional setup after loading the view, typically from a nib.
    [_ViewerContents setDataSource:(id)self];
}

- (void)didReceiveMemoryWarning
{
    [super didReceiveMemoryWarning];
    // Dispose of any resources that can be recreated.
}

@end
参考サイト
Collection Viewの使い方