twitterの投稿画面風UIの作り方
iPhone版twitterアプリのようなアップロードUIを作ってみました。

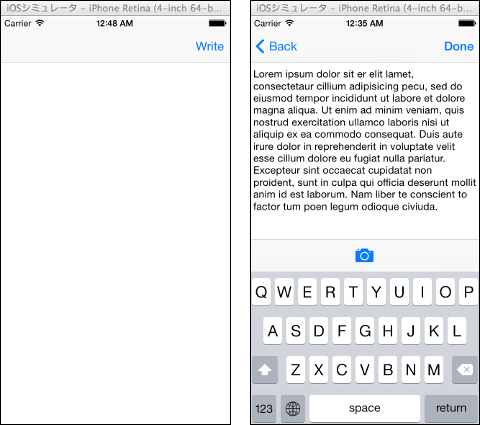
こういうやつです。上記はtwitterのtweet入力画面です。
テキストを入力する場所があって、その下にキーボードがある。さらにその間にツールバーのような領域があってボタンを配置できる。というもの。twitterの場合は位置情報とカメラとフォトライブラリの3つのボタンがあります。
調べていくとUITextViewのAccessoryViewを使えば実現できることが分かりました。
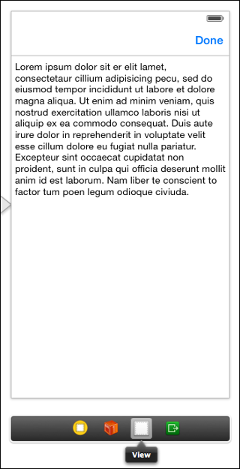
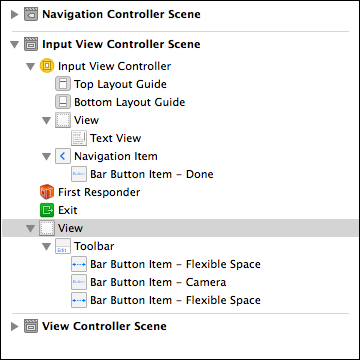
作ってみたものはSingleViewApplicationをベースにNavigationControllerを入れて初期画面のWriteボタンをタップしたら入力用の画面へ遷移する。遷移先にはUITextViewと、UIViewにラップされたツールバーがあってツールバーにカメラボタンが含まれているというものです。
#カメラボタンを押した時の挙動は実装してないのでログしかでません。。

#UITextViewに表示されている英文はデフォの文章です
AccessoryView用のUIViewはInterfaceBuilderのDockエリアに置くことです。実験した環境ではDockエリアでは無いところに置くとキーボードの下に隠れてしまいました。

InterfaceBuilder上の親子関係はこんな感じ。

ちなみにchatworkのモバイルアプリでも同じようなUIが使われてます。わりと一般的なUIのはずなのに日本語で解説してるサイトが少なすぎる。
Dockエリアに置いている状態だとInterfaceBuilder上で見た目が確認できないのでAccessoryViewを弄るときは一度どこかのサブビューに置いてからの方がよいと思います。
ソース全文
//
//  MUInputViewController.m
//  modernUpload
//
//  Created by 島田克弥 on 2014/03/15.
//  Copyright (c) 2014年 shimada-k. All rights reserved.
//

#import "MUInputViewController.h"

@interface MUInputViewController ()
@property (weak, nonatomic) IBOutlet UITextView *sendTextView;
@property (strong, nonatomic) IBOutlet UIView *accessoryView;

- (IBAction)startCamera:(UIBarButtonItem *)sender;
- (IBAction)writeDone:(UIBarButtonItem *)sender;

@end

@implementation MUInputViewController

- (id)initWithNibName:(NSString *)nibNameOrNil bundle:(NSBundle *)nibBundleOrNil
{
    self = [super initWithNibName:nibNameOrNil bundle:nibBundleOrNil];
    if (self) {
        // Custom initialization
    }
    return self;
}

- (void)viewWillAppear:(BOOL)animated {
    [super viewWillAppear:animated];

    // 入力状態にする
    [self editAction:self];
}


- (void)viewDidLoad
{
    [super viewDidLoad];
    // Do any additional setup after loading the view.

    _sendTextView.delegate = self;
    // キーボードが出てくる時の通知を受け取るよう設定
    [[NSNotificationCenter defaultCenter] addObserver:self
                                             selector:@selector(keyboardWillShow:)
                                                 name:UIKeyboardWillShowNotification
                                               object:nil];
    // キーボードが閉じらる時の通知を受け取るよう設定
    [[NSNotificationCenter defaultCenter] addObserver:self
                                             selector:@selector(keyboardWillHide:)
                                                 name:UIKeyboardWillHideNotification
                                               object:nil];

}

- (IBAction)writeDone:(UIBarButtonItem *)sender {
    [_sendTextView resignFirstResponder];
}

- (void)editAction:(id)sender {
    [_sendTextView becomeFirstResponder];
}

- (void)didReceiveMemoryWarning
{
    [super didReceiveMemoryWarning];
    // Dispose of any resources that can be recreated.
}

#pragma mark - Text view delegate methods
- (BOOL)textViewShouldBeginEditing:(UITextView *)textView{

    if (_sendTextView.inputAccessoryView == nil) {
        _sendTextView.inputAccessoryView = _accessoryView;
    }

    return YES;
}

- (BOOL)textViewShouldEndEditing:(UITextView *)textView {

    [textView resignFirstResponder];

    return YES;
}

#pragma mark - Responding to keyboard events
- (void)keyboardWillShow:(NSNotification *)notification {

    NSDictionary *userInfo = [notification userInfo];

    // キーボードが表示完了後の場所と大きさを取得する
    NSValue *aValue = [userInfo objectForKey:UIKeyboardFrameEndUserInfoKey];

    CGRect keyboardRect = [aValue CGRectValue];
    keyboardRect = [self.view convertRect:keyboardRect fromView:nil];

    CGFloat keyboardTop = keyboardRect.origin.y;
    CGRect newTextViewFrame = self.view.bounds;

    // キーボードの大きさに応じてテキスト表示領域を再計算する
    newTextViewFrame.size.height = keyboardTop - self.view.bounds.origin.y;

    // キーボードのアニメーション時間を取得する
    NSValue *animationDurationValue = [userInfo objectForKey:UIKeyboardAnimationDurationUserInfoKey];
    NSTimeInterval animationDuration;
    [animationDurationValue getValue:&animationDuration];

    // アニメーション実行準備
    [UIView beginAnimations:nil context:NULL];
    [UIView setAnimationDuration:animationDuration];

    // UITextViewの大きさを変更する
    _sendTextView.frame = newTextViewFrame;

    // アニメーションの開始
    [UIView commitAnimations];
}

- (void)keyboardWillHide:(NSNotification *)notification {

    NSDictionary *userInfo = [notification userInfo];

    // キーボードのアニメーション時間を取得する
    NSValue *animationDurationValue = [userInfo objectForKey:UIKeyboardAnimationDurationUserInfoKey];
    NSTimeInterval animationDuration;
    [animationDurationValue getValue:&animationDuration];

    [UIView beginAnimations:nil context:NULL];
    [UIView setAnimationDuration:animationDuration];

    // UITextViewの大きさを元に戻す
    _sendTextView.frame = self.view.bounds;

    // アニメーションの開始
    [UIView commitAnimations];
}


/*
#pragma mark - Navigation

// In a storyboard-based application, you will often want to do a little preparation before navigation
- (void)prepareForSegue:(UIStoryboardSegue *)segue sender:(id)sender
{
    // Get the new view controller using [segue destinationViewController].
    // Pass the selected object to the new view controller.
}
*/

- (IBAction)startCamera:(UIBarButtonItem *)sender {
    NSLog(@"写真がとれたらいいね");
}

@end
参考サイト