CollectionViewとWebViewで画像ビューワを作ってみる
せっかくiOSの開発環境が手元にあるので試しにアプリを作ってみました。
webの画像をCollectionViewで表示する画像ビューワです。
Googleのロゴ画像を出しています。

WebViewでロゴ画像のURLを指定してCollectionViewで並べてるだけです。
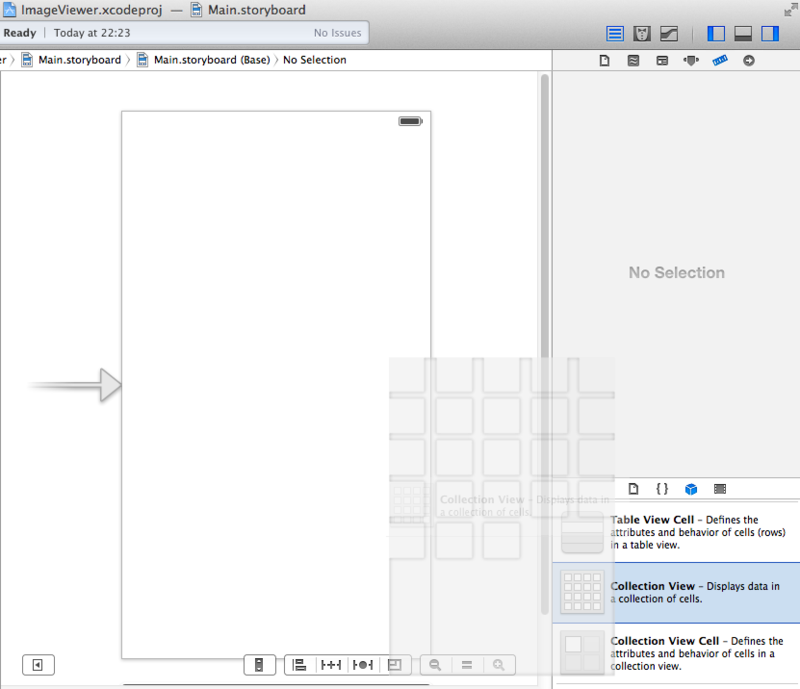
まずCollectionViewを追加します。ControllerではなくViewのほう。

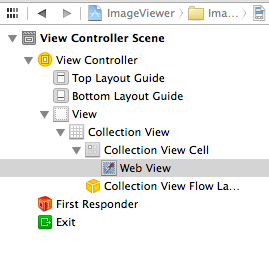
次にCellの中にWebViewを追加します。

親子関係はこんな感じ。

CollectionViewのセルにIDを振っておきます。ソースからアクセスするためです。
WebViewにタグを付けておきます。これもソースからアクセスするためです。

最後にCollectionViewをソースとアウトレット接続します。mファイルに接続しておきます。
これでIBの操作は終わり。あとはソースを書いていきます。
データソースの指定をやります。viewDidLoadの中。
[_ViewerContents setDataSource:(id)self];
numberOfSectionsInCollectionViewとnumberOfItemsInSectionメソッドを追加します。セクションは1つだけで今回はセルの数を36とか適当に指定しておきます。
- (NSInteger)numberOfSectionsInCollectionView:(UICollectionView *)collectionView
{
    //セクションは1つ
    return 1;
}

// セルの個数を返すメソッド
-(NSInteger)collectionView:(UICollectionView *)collectionView numberOfItemsInSection:(NSInteger)section{
    return 36;
}
cellForItemAtIndexPathを追加します。こいつはセルごとに呼び出されるメソッドです。今回はGoogleのロゴ画像を36個分、同じものを表示するので、indexPath.rowでごにょごにょする必要なし。
ここまでで先ほどのアプリが完成。ただし「Google」のGの上の方しか表示されてないのでIBでWebViewを選択して「Scales Page To Fit」にチェックを入れておきます。これで画像ファイルの大きさがWebViewのサイズにあわせて自動的にスケールしてくれます。

これで縦のサイズはWebViewにスケールしてくれました。まあ、Googleは横長なんでしょうがないってことで。

ソース全文
IVViewController.m
//
//  IVViewController.m
//  ImageViewer
//
//  Created by 島田克弥 on 2014/02/15.
//  Copyright (c) 2014年 shimada-k. All rights reserved.
//

#import "IVViewController.h"

@interface IVViewController ()
@property (weak, nonatomic) IBOutlet UICollectionView *ViewerContents;

@end

@implementation IVViewController

- (NSInteger)numberOfSectionsInCollectionView:(UICollectionView *)collectionView
{
    //セクションは1つ
    return 1;
}

// セルの個数を返すメソッド
-(NSInteger)collectionView:(UICollectionView *)collectionView numberOfItemsInSection:(NSInteger)section{
    return 36;
}

//Method to create cell at index path
-(UICollectionViewCell *)collectionView:(UICollectionView *)collectionView cellForItemAtIndexPath:(NSIndexPath *)indexPath{

    NSLog(@"セル番号だよ index_path.row:%ld", indexPath.row);
    UICollectionViewCell *cell;

    cell = [collectionView dequeueReusableCellWithReuseIdentifier:@"cell1"forIndexPath:indexPath];
    cell.backgroundColor = [UIColor blackColor];

    UIWebView *image = (UIWebView *)[cell viewWithTag:1];

    NSString *str_url = @"https://www.google.co.jp/images/srpr/logo11w.png";
    NSURL * url = [NSURL URLWithString:str_url];
    NSURLRequest *urlReq = [NSURLRequest requestWithURL:url];
    [image loadRequest:urlReq];

    return cell;
}

- (void)viewDidLoad
{
    [super viewDidLoad];
	// Do any additional setup after loading the view, typically from a nib.
    [_ViewerContents setDataSource:(id)self];
}

- (void)didReceiveMemoryWarning
{
    [super didReceiveMemoryWarning];
    // Dispose of any resources that can be recreated.
}

@end
参考サイト
Collection Viewの使い方